Using two screwdrivers with a 0.4 mm blade height and 8 mm width, this page covers removing a Volkswagen Golf Mk7 rear head restraint guide — remove the head restraint first, then push the backrest cover and padding slightly aside.
 Note Note
| 2 commercially available screwdrivers with a blade height of
0.4 mm and a blade width of 8 mm are required for removal. |
|
|
|
| – |
Remove rear head restraint
→ Chapter. |
| – |
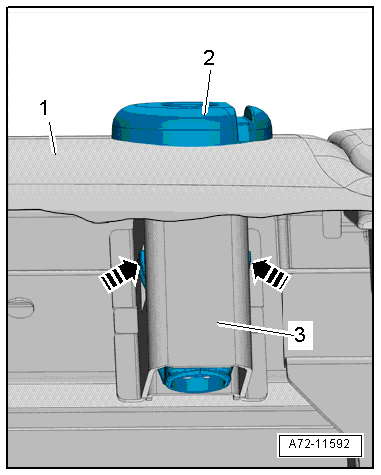
Push backrest cover and backrest padding
-1- slightly downwards at outer
sides. |
| – |
Insert a screwdriver on both sides of head restraint guide
-3- into backrest up to locking
lugs -arrows-. |
Note
| Position the 2 screwdrivers next to the locking lugs so that
the flat side of the blade rests against the locking lugs. |
| – |
Turn both screwdrivers by 90° to release locking lugs of
head restraint guide. |
| – |
Use a third screwdriver to carefully lever head restraint
guide -2- out of backrest. |
| Installation is carried out in reverse order. |
| |
→ Chapter „Assembly overview - rear seat backrest“ |
|
|
|
Questions & answers
Removing and installing head restraint guide — Volkswagen Golf Mk7
How do I remove a Golf Mk7 rear head restraint guide tube?
Two flat screwdrivers (0.4 × 8 mm) are needed. Press the locking lugs inward and push the guide tube downward out of the backrest frame.
Removing
–
Press release button -3- for
height adjustment on head restraint guide
-4- in -direction of arrow-.
...
Special tools and workshop equipment
required
Torque wrench -V.A.G 1410-
...


