| – |
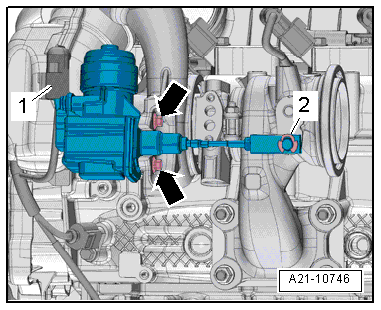
Disconnect electrical connector -1-. |
| – |
Remove securing clip -2-. |
| – |
Remove bolts -arrows- and
detach charge pressure positioner -V465-. |
| Installation is carried out in the reverse order. When
installing, note the following: |
| Renew securing bolts and retaining clips. |
 Note Note
| There may be different types of charge air pressure
controllers installed. |
| Charge air pressure controller without adjustable linkage |
| – |
Adapt engine control unit -J623- to charge air pressure
controller -V465- using → Vehicle
diagnostic tester. |
| Charge air pressure controller with adjustable linkage |
| – |
Fit thread of charge pressure positioner -V465- at central
position in joint element. |
| – |
Adjust charge air pressure controller -V465-:
→ Vehicle
diagnostic tester Select 01 -
Adjust charge air pressure controller V465 in
Guided functions. |
| – |
Adjust to specified value by turning linkage. For specified
value, see → Vehicle
diagnostic tester. |
| – |
Tighten lock nut to 6 Nm and secure with sealing paint. |
| → Chapter „Assembly overview - turbocharger“ |
|
|
|
Questions & answers
Removing and installing charge pressure positioner -V465- — Volkswagen Golf Mk7
How do I remove the Golf Mk7 1.4 TSI charge pressure positioner -V465-?
Disconnect the vacuum/electrical connector, unbolt the actuator from the turbo housing and remove.
Special tools and workshop equipment
required
Engine bung set -VAS 6122-
...

 Removing and installing turbocharger