 WARNING
| Keep bonding surface free of dirt and grease. |
| Do not treat bonding surface with activator
immediately after cutting back. Do not prime. Do not
treat with cleaning solution. |
|
|
|
|
| – |
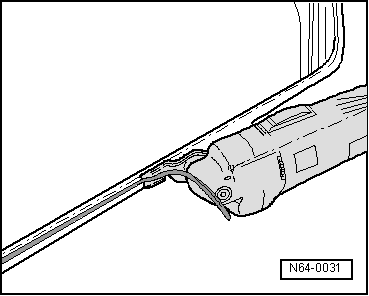
Cut back remaining material on body flange with U-shaped
blade -V.A.G 1561/3-, but do not remove completely. |
 Note
| The remaining material is required as a base for the new
adhesive sealing material. Keep dirt and grease off of bonding
surfaces. |
WARNING
| Exception: if bonding is performed later than one
day after cutting back adhesive bead, the remaining
residual material must be activated with activator. |
| Apply activator evenly in one stroke using
applicator. |
| Activator must not come in contact with paint, or
the paintwork will be damaged. |
| Drying time approx. 10 minutes |
|
| |
If the window flange has been repaired or partially renewed,
the area concerned must be cleaned and primed again after
painting. |
Note
| It is possible that a laser weld seam lies outside the area
of the adhesive bead. In this case, the exposed weld seam must
be sealed with glass adhesive before bonding the window. |
|
|
|
| – |
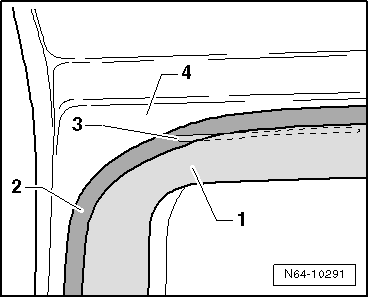
If laser weld seam -3- on metal
flange -4- is not covered by
existing adhesive bead -1-, coat
laser weld seam -3- with
glass/paint primer -D 009 200 02--3-.
Then fill laser weld seam with glass adhesive -DH 009 100 A2--1-. |
| Paint structure must be restored after damage to the
paintwork according to specifications in the “Paint” workshop
manual. |
|
|
|
Questions & answers
Preparing body flange for fitting — Volkswagen Golf Mk7
How do I prepare the Golf Mk7 body flange for a new windscreen?
Cut back the remaining adhesive to 1–2 mm, keep the surface free of dirt and grease, do not apply activator or cleaning solution to the cut-back area. If bare metal is exposed, apply primer.
Note
The area on which the adhesive bead is applied is not
precoated or primed.
The seali ...
–
Use adhesive remover -D 002 000. 10- as cleaning agent.
Observe the appropriate safety precautions when performing this
work.
...


