| Special tools and workshop equipment
required |
|
|
|
| |
|
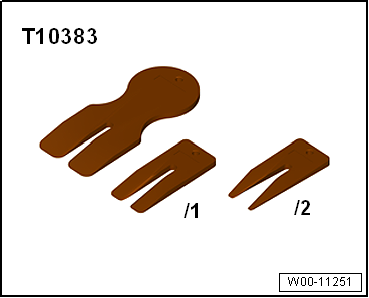
Wedges -T10383 |
| Upper part of B-pillar trim |
 Note
Note
| Removal and installation are described for the left vehicle side.
Follow same instructions for the right side as appropriate. |
| – |
Remove front belt end fitting
→ Chapter. |
| – |
Move belt height adjuster to lowest position. |
| – |
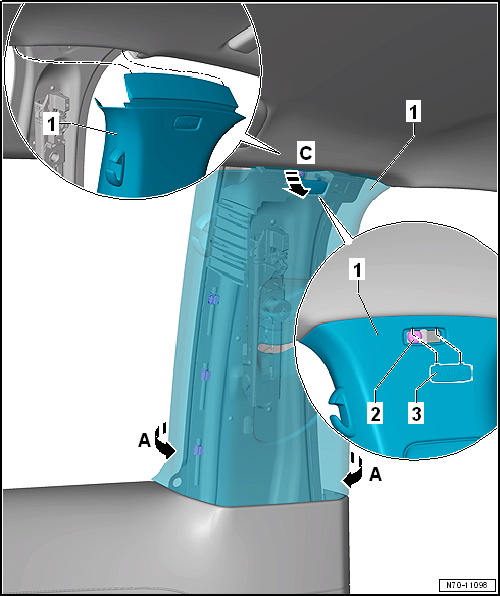
Lever out cap -3- marked with an
“airbag” symbol using a screwdriver. |
| – |
Release side trim panel in area of overlap to upper B-pillar trim
-1-
→ Chapter. |
| – |
Starting at bottom, detach upper B-pillar trim
-1- from door seal and release it from retaining clips
-arrows A- using wedge -T10383-. |
| – |
Pull upper B-pillar trim -1- out of
body mounting -arrow C-. To do this, swing
trim towards inside and simultaneously pull it off downwards. |
| – |
Thread out belt webbing through slider for belt height adjuster and
remove upper B-pillar trim. |
Note
-
| |
Before installing, check all fasteners for damage and
renew if necessary. |
-
| |
Following installation, ensure that the upper
B-pillar trim is positioned in door seal beading. |
| Installation is carried out in reverse order. |
| |
→ Chapter „Assembly overview - B-pillar trim“ |
|
|
|
Questions & answers
Removing and installing B-pillar trim, 2-door models — Volkswagen Golf Mk7
How do I remove the Golf Mk7 2-door B-pillar trim?
Upper: use wedges -T10383-, unclip. Different clip positions from 4-door due to the wider door aperture.
Special tools and workshop equipment
required
Wedges -T10383
&n ...
Note
Removal and installation are described for the left
vehicle side. Follow same instructions for the right side as
appropriate.
...


